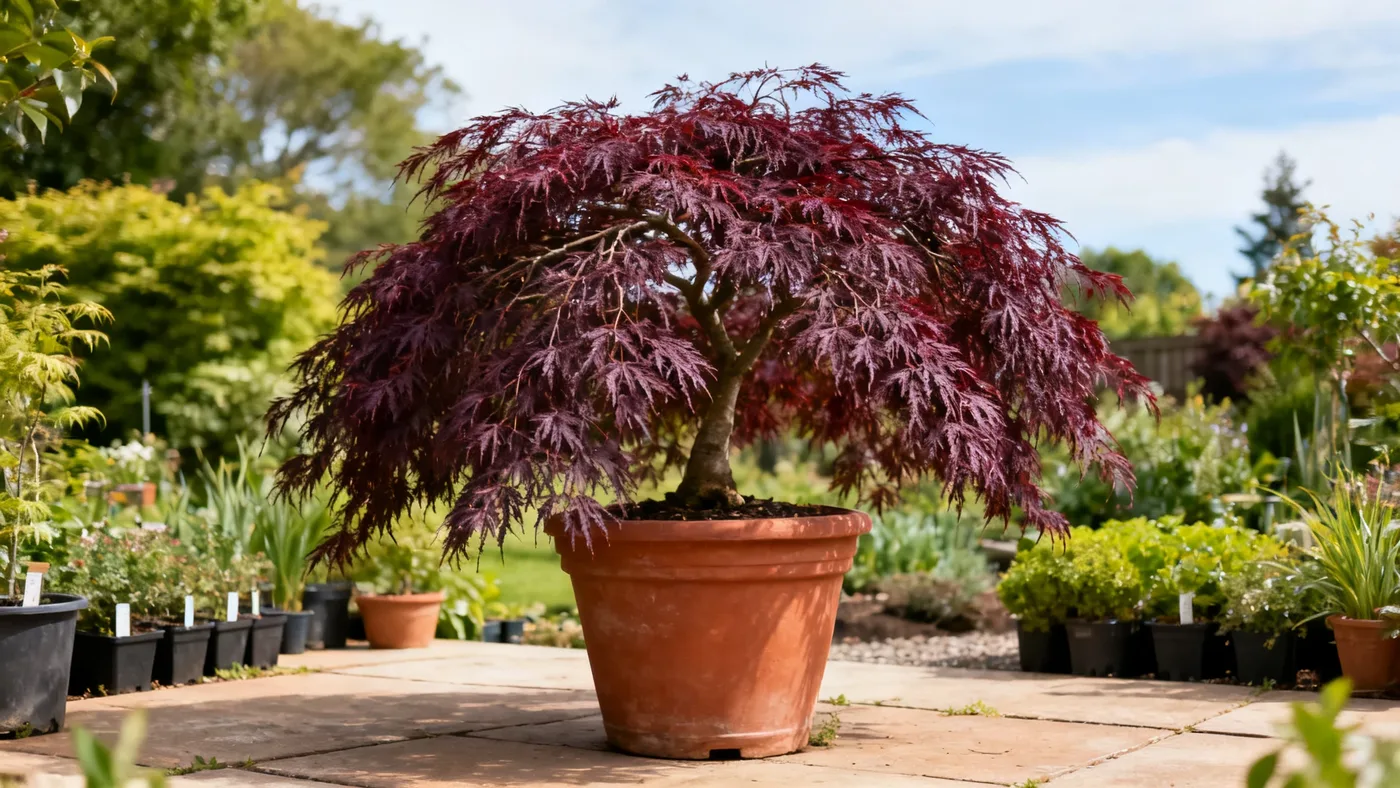
Growing Tamukeyama Japanese Maple in Pots and Containers
Tamukeyama Japanese Maple looks right at home in a container. Its weeping, cascading form actually shows better in a pot than almost anywhere else, and you have complete control over soil, drainage, and placement. If you're growing this cultivar in a pot, you're making a smart choice, and this guide walks you through everything you need to know.
Why Choose Container Growing for Tamukeyama?
Growing Tamukeyama Japanese Maple in a pot or container gives you several advantages. You can position it exactly where you want it: on a patio, entryway, or near a water feature. Containers let you dial in the soil mix to match its preferences for slightly acidic, well-drained conditions. And if you live in a colder zone or a region with intense summer heat, a container lets you move the plant to shade or shelter when it needs protection.
The weeping habit of Tamukeyama is especially striking in containers. The cascading branches can drape over the pot's edges, creating that fountain-like silhouette that draws the eye. Many gardeners find container-grown specimens become prized focal points in yards or patios within just a few years.
Choosing the Right Container
Size matters more than most gardeners expect. Start with a container that is at least 12 inches in diameter for a young nursery-grown Tamukeyama, usually sold in quart or #1 containers. As your maple grows, you will eventually move it to a larger pot, typically 18 to 24 inches in diameter for a more established plant. The bigger the pot, the more stable your watering will be.
Always ensure the container has drainage holes. No exceptions. Water sitting at the root zone will invite root rot and Phytophthora, diseases that can kill your maple even before you notice symptoms. If a pot looks beautiful but lacks drainage, use it as a cover pot around a draining container instead.
Material choices include ceramic, plastic, or wood. Ceramic and stone retain moisture longer, which is useful in drier climates; plastic dries faster, which suits humid regions or frequent waterers. In colder zones (5-7), avoid very thin plastic pots left outside in winter, as the roots can experience damaging freeze-thaw cycles. Wood containers with a landscape fabric liner can work well if replaced every few years as they rot.
Essential Materials and Ingredients
Before you plant, gather these supplies:
- A pot with drainage holes, 12 to 24 inches in diameter depending on your maple's size
- Well-drained potting soil or a mix of loam, peat moss, and perlite in equal parts
- Slow-release, balanced fertilizer formulated for woody ornamentals or acid-loving plants
- A small hand shovel or scoop
- Mulch (optional; use sparingly if at all in containers)
- Gloves and pruners for potential tidying during planting
Quality potting soil is worth the investment. Avoid generic "all-purpose" mixes; your Tamukeyama thrives in slightly acidic to neutral soil, roughly pH 5.5 to 6.5. Many bagged potting mixes are closer to neutral, so a mix designed for rhododendrons or azaleas often works perfectly.
Step-by-Step Container Planting Guide
Step 1: Prepare Your Pot and Soil Mix
Fill your container about one-third full with your prepared soil mix. If using a new ceramic or terracotta pot, soak it in water for an hour first to prevent it from wicking moisture away from the soil later. Mix any amendments into your soil now. You want a consistent, loose texture before planting.
Step 2: Prepare Your Maple for Planting
Water your Tamukeyama thoroughly the day before planting if it comes from a nursery. This hydrates the root ball and makes the transition to its new home less stressful. Gently loosen the root ball with your fingers, but do not aggressively tease apart the roots. You are looking for a light loosening, not a complete separation.
Step 3: Position the Maple in the Pot
Center your maple in the container so the top of its root ball is roughly level with the soil surface, maybe an inch below the rim. The base of the trunk should remain above the soil line. Planting too deep invites stem rot. Step back and look at it from a few angles; the cascading branches should hang evenly.
Step 4: Backfill with Soil
Add soil mix around the sides of the root ball, gently firming it with your hands. Do not compact heavily; you want the soil in contact with the roots, but air pockets help prevent settling. Fill until the pot is full and the soil is level with the root ball's top.
Step 5: Water Thoroughly
Water until water drains from the bottom. This settles the soil and removes air pockets. Wait a few hours, then water again. Container soil compacts more than in-ground soil, so this second watering helps ensure good contact between roots and soil.
Step 6: Choose Your Location
Place your potted Tamukeyama where it will receive full sun to partial shade. If you live in zones 8 or 9, or where summers are very hot, afternoon shade is beneficial to prevent leaf scorch. A spot with morning sun and afternoon shelter from hot western sun is ideal in warm climates. In cooler zones (5-7), more sun is generally better for color development.
Watering and Moisture Management
This is where container growing requires more attention than in-ground planting. Container specimens need more frequent watering because the soil volume is limited. Check the soil moisture by inserting your finger about an inch into the top of the soil. If it feels dry at that depth, water thoroughly until it drains from the bottom.
In spring and fall, watering every two to four days is typical. During peak summer heat, daily watering may be necessary, especially for containers smaller than 18 inches in diameter. In winter, when the tree is dormant, reduce watering significantly but do not let the root ball completely dry out.
The goal is consistent moisture without waterlogging. Too little water and the fine, lacy foliage will scorch and drop. Too much water and you invite root rot. Most problems arise from overwatering rather than underwatering, so err on the side of caution and let the soil dry slightly between waterings.
If your container is in a sheltered spot or you live in a dry climate, mulch can help. Use just half an inch of shredded bark or similar material; excessive mulch piled around the trunk traps moisture and encourages rot.
Fertilizing Container-Grown Maples
Container-grown plants cannot reach out into surrounding soil for nutrients, so feeding is more important than for in-ground specimens. In early spring, once new growth appears, apply a balanced, slow-release fertilizer formulated for woody ornamentals or acid-loving plants. Follow the package instructions; do not guess at dosages.
Avoid excess nitrogen, which pushes weak, spindly growth at the expense of color and structure. A 10-10-10 or 12-4-8 ratio is ideal. Feed once in early spring; that single application usually sustains the plant through the growing season. If growth seems sluggish by midsummer, you can apply a half-dose of water-soluble fertilizer, but a second spring feeding is rarely necessary.
Seasonal Care and Winter Protection
Early spring and fall are the best times to plant a Tamukeyama in a container. Avoid planting during hot summer heat or during a hard freeze.
Winter hardiness depends on your zone. Tamukeyama is rated for USDA zones 5 through 8, with performance in zone 9 depending heavily on summer heat and afternoon shade. In zones 5 and 6, container-grown roots are more vulnerable to freeze damage than in-ground roots because they are above ground and exposed on all sides. In late fall, once the maple has dropped its leaves, consider moving the container against a north-facing house wall or into an unheated garage or shed. The goal is not to keep the roots warm, but to minimize wild swings between freeze and thaw that can damage fine roots.
In zones 7 and 8, winter protection is less critical, but moving the pot to a sheltered spot still helps. In zone 9, the challenge is usually summer heat, not winter cold, so prioritize afternoon shade and consistent watering.
Managing Growth and Preventing Problems
Tamukeyama grows slowly, roughly 6 to 12 inches per year. Over time, a container-grown specimen will eventually reach 6 to 10 feet tall and 8 to 12 feet wide, though it will take many years to approach those dimensions.
Minimal pruning is the rule. Remove only dead wood, branches that cross, or growth that heads downward when you want upward or outward development. Prune in late fall through winter dormancy. Avoid heavy pruning, which stresses the tree and can invite disease.
Repotting every three to five years prevents girdling roots, a common and serious problem in long-lived container specimens. Girdling roots wrap around the inside of the pot and eventually choke off the tree's nutrient and water uptake. When you repot, size up by 2 to 4 inches in diameter. If your maple has reached its ideal display size and you prefer not to upgrade the pot, you can root-prune instead: gently tip the tree out, prune back the outermost 2 to 3 inches of roots with sharp pruners, and return it to fresh soil in the same pot.
Watch for pests such as aphids, scale, mites, and Japanese beetles, which are more likely to colonize stressed plants. Ensure consistent watering and avoid excess fertilizer to keep your maple vigorous. If you spot pests, address them promptly with horticultural oil or insecticidal soap, following product instructions.
Common Container Growing Mistakes
- Planting too deep. Burying the trunk invites rot.
- Skipping drainage holes. It is the single most common cause of death in container maples.
- Assuming one watering schedule fits your climate and season. Check the soil, not the calendar.
- Fertilizing excessively. Heavy feeding pushes weak growth and reduces the plant's natural color intensity.
- Leaving your Tamukeyama in the same pot for a decade. Girdling roots will eventually strangle the tree.
- Ignoring pests. Container plants in sheltered spots can accumulate aphids or scale more easily than in-ground trees.
Expected Results and Timeline
A young Tamukeyama in a container will settle into its new pot over the first month. New growth usually appears in spring if you plant in early spring, or the following spring if you plant in fall. Do not expect dramatic growth the first year; the tree is investing energy in root establishment.
By the second year, your maple will put on visible growth. The cascading branching habit will become more pronounced, and the weeping form will deepen. The deep red-purple foliage will strengthen in color. In fall, you will see that famous color shift. Learn more about this transformation in our guide to why Tamukeyama fall color turns fiery crimson.
By year three to five, your container-grown Tamukeyama will be a standout focal point on any patio. It may reach 4 to 6 feet tall and nearly as wide, depending on your care and location. This is when most gardeners find their container maple truly earns its place.
With proper care, your Tamukeyama will live 50 to 100 years or more. The container-growing journey is a long one, but the payoff is a stunning, long-lived ornamental that you can enjoy and adjust year after year. For comprehensive ongoing care guidance, see our complete growing guide for Tamukeyama Japanese Maple.
Container Growing Quick Reference
| Task | Timing | Notes |
|---|---|---|
| Plant | Early spring or fall | Avoid summer heat or hard freezes |
| Water | Spring/fall: every 2-4 days; summer: possibly daily; winter: reduce significantly | Check soil moisture before watering |
| Fertilize | Early spring (once) | Use balanced, slow-release fertilizer; avoid excess nitrogen |
| Repot or root-prune | Every 3-5 years | Prevents girdling roots |
| Prune | Late fall through winter dormancy | Remove dead, crossing, or downward-facing branches |
| Check for pests | Year-round, especially warm months | Watch for aphids, scale, mites, Japanese beetles |
| Winter protection (zones 5-6) | Late fall | Move to sheltered location such as house wall or unheated shed |
| Monitor foliage color | Spring and fall | Bright red-purple foliage in spring; crimson to scarlet in fall |